Welcome To Soup Meets Bowl - The Best Soup Recipes & More

Warm Up With Our Latest Soup Recipes

Comforting Slow Cooker Cabbage & Bean Soup


Slow Cooker Cabbage & Bean Soup

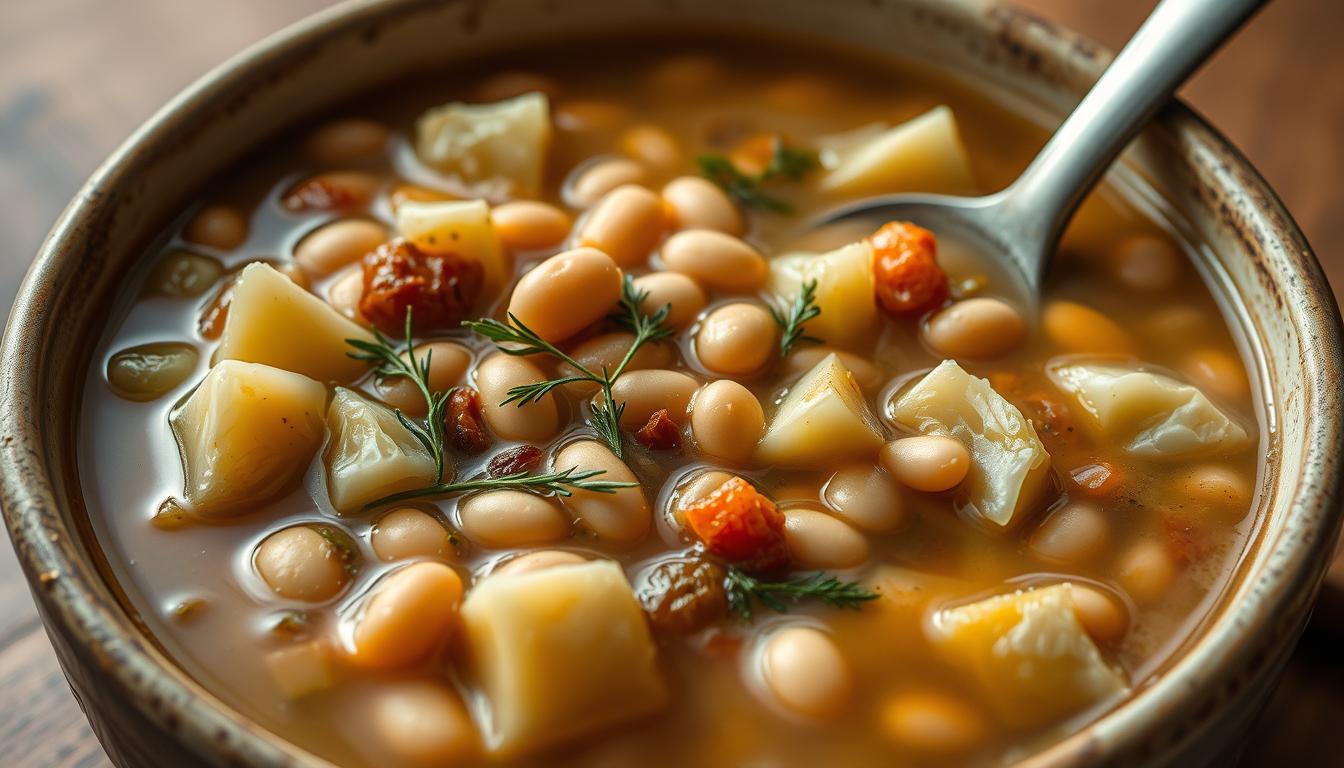
Are you looking for a meal that’s both delicious and healthy? Wondering if slow cooker cabbage and bean soup is the answer? This soup is packed with flavor and offers many health benefits, making it perfect for a cold day. It’s easy to make in a slow cooker, which is great for those who want a simple yet nutritious meal.

This slow cooker cabbage and bean soup is also a fantastic choice for vegetarians. You can adjust the ingredients to fit your taste and dietary needs. It’s a comforting and nutritious option for any day.

Key Takeaways

  • You can make a delicious and healthy slow cooker cabbage and bean soup with minimal effort.
  • This soup is an excellent option for easy soup recipes and healthy slow cooker recipes.
  • Slow cooker cabbage and bean soup is a great example of vegetarian slow-cooker meals.
  • You can customize this soup to suit various tastes and dietary preferences.
  • This soup provides a perfect blend of comfort and nutrition, making it an ideal choice for a chilly day.
  • Slow cooker cabbage and bean soup is a low-maintenance and nutritious meal option.

Why Make Slow Cooker Cabbage & Bean Soup

When looking for healthy soup recipes, slow cooker cabbage & bean soup is a great pick. It’s full of benefits, making it perfect for those wanting easy meal solutions. You get a tasty, healthy meal without losing out on flavor or convenience.

This soup is not just good for you; it’s also easy on your wallet. It’s a cost-effective meal solution that’s simple to make. Just throw everything in the slow cooker and let it cook for 6 to 8 hours. You’ll end up with a delicious, tender soup.

Some key benefits of this recipe include:

  • High fiber and protein content, making it an excellent option for those seeking a nutritious meal
  • Low calorie count, with approximately 115.95 kcal per serving
  • Rich in essential vitamins and minerals, such as iron, vitamin A, and vitamin C

Adding slow cooker cabbage &bean soup to your meals is a smart move. It’s a healthy soup recipe that’s also cost-effective. Its health benefits and ease of making make it a great choice for any meal plan.

Looking for a cost-effective meal solution or a healthy soup recipe? Slow cooker cabbage & bean soup is a top choice. Its rich flavor and health perks make it a must-have in your meal rotation.

Essential Ingredients for Your Soup

To make a delicious slow cooker cabbage & bean soup, you need some key ingredients. These include cabbage, beans, veggies, broth, and spices. The slow cooker cabbage & bean soup ingredients are key to the soup’s taste and health benefits. You can adjust the recipe to your liking by adding or swapping different items.

Healthy ingredients like carrots, potatoes, and zucchini are great for your soup. You can also try different beans, like kidney, cannellini, or black beans. For those on a plant-based diet, the vegetarian soup ingredients are perfect. Here are the main ingredients you’ll need:

  • 1 head of cabbage, shredded
  • 1 can of diced tomatoes, 14.5 ounces
  • 1 can of green beans, 14.5 ounces
  • 6 cups of vegetable stock
  • 1 teaspoon of Italian seasoning
  • 1/2 teaspoon of chili powder
  • Salt and pepper to taste

Choose fresh, high-quality ingredients for a nutritious and tasty soup. Feel free to try different spices and herbs to make your soup stand out.

slow cooker cabbage & bean soup recipe ingredients

With these essential ingredients, you can make a delicious slow cooker cabbage & bean soup. It’s perfect for any time you want a healthy meal or a comforting soup.

Preparing Your Ingredients

Getting ready for slow cooker cabbage & bean soup is key. You’ll need to chop the cabbage and other veggies. Also, cook the beans as the recipe says. You can shred, chop, or keep the cabbage in wedges, as you like. For beans, kidney or black beans work well, and follow the recipe for prep.

For a healthy soup, use fresh, good ingredients. Add carrots, celery, onions, and garlic for flavor. You can chop, slice, or dice veggies for the look and feel you want.

Prep ingredients ahead to make things easier. Chop cabbage and veggies a day early and keep them cold. Cook beans before and store them tightly. This saves time and effort later.

Here are some tips for prep:

  • Use fresh, healthy ingredients for a good soup
  • Chop, slice, or dice veggies for the look and feel you want
  • Cook beans as the recipe says and store them tightly
  • Prep ingredients early to save time and effort

Follow these tips and use the right cutting techniques. You’ll make a tasty, healthy slow cooker cabbage & bean soup for any time.

Step-by-Step Cooking Instructions

To make a tasty slow cooker cabbage & bean soup, start by sautéing 3 carrots and 4 cloves of garlic for 5 to 8 minutes. Next, add 1 small wedge of cabbage, 2 cans of white beans, and 5 cups of water to the slow cooker. Season with 1 ½ teaspoons of salt and your favorite spices.

Cook the mix on low heat for 6 hours for a healthy soup. You can also add 1 lb of ground beef for more protein. After 6 hours, the soup is ready to eat. Serve it with cauliflower rice or crusty bread. This recipe makes 6 servings, each with about 221 kcal, 17 g of carbs, and 20 g of protein.

Here is a summary of the nutritional information per serving:

Nutrient Amount per serving
Calories 221 kcal
Carbohydrates 17 g
Protein 20 g
Fat 8 g

slow cooker cabbage & bean soup recipe

By following these steps, you can make a delicious and healthy slow cooker cabbage & bean soup. It’s great for a weeknight dinner or a weekend meal. Enjoy!

Seasoning Your Soup to Perfection

When making slow cooker cabbage & bean soup, think about the seasoning. It’s key to a great taste. You can pick from many seasoning blends, including healthy ones with less salt and preservatives.

Start with spices like paprika, garlic powder, and chili powder. They add depth and warmth. Play with spice ratios to match your taste. Try 2:1:1 for paprika, garlic, and chili, and adjust as needed.

Essential Spice Combinations

  • Paprika: adds a smoky, slightly sweet flavor
  • Garlic powder: adds a savory, aromatic flavor
  • Chili powder: adds a spicy, smoky flavor

Keep tasting and adjusting the seasoning. Add broth, salt, or pepper as needed. Aim for a flavor that enhances the cabbage and beans. This way, you’ll make a tasty, healthy meal for any time.

slow cooker cabbage & bean soup seasoning

Adjusting Flavors During Cooking

While cooking, tweak the flavors with more spices, herbs, or seasonings. Try dried thyme or rosemary for a fresh taste. A squeeze of lemon or apple cider vinegar adds brightness and acidity.

Spice Combination Flavor Profile
Paprika, garlic powder, chili powder Smoky, savory, spicy
Thyme, rosemary, bay leaves Fresh, herbaceous, slightly bitter

Storage and Reheating Guidelines

There are a few ways to store your slow cooker cabbage & bean soup. You can keep it in the fridge for up to three days or freeze it for later. Always cool the soup to room temperature before refrigerating or freezing. This step helps prevent bacterial growth and keeps your soup fresh.

For healthy soup storage, use airtight containers or freezer bags. Make sure to leave about an inch of space at the top for expansion. When reheating, follow reheating guidelines for food safety. Heat the soup to a boil for three minutes to kill harmful bacteria. Use an instant-read thermometer to check the temperature.

Here are some tips for storing and reheating your soup:

  • Store in the refrigerator at 40 degrees Fahrenheit or below
  • Freeze at 0 degrees Fahrenheit for up to three months
  • Reheat to an internal temperature of above 165°F
  • Use an ice bath to cool the soup quickly

slow cooker cabbage & bean soup storage

By following these reheating guidelines and healthy soup storage tips, you can enjoy your slow cooker cabbage & bean soup for a longer period. This way, you maintain its quality and safety.

Customizing Your Cabbage & Bean Soup

Exploring slow cooker cabbage & bean soup variations opens up a world of healthy options. With a few tweaks, you can make delicious vegetarian soups for a quick meal. Start by adding your favorite spices and herbs for a unique taste.

Consider adding a pinch of black pepper or diced carrots for sweetness. Try different beans like kidney or black beans to change the soup’s texture and taste.

For more protein, add diced chicken or tofu. This boosts protein and adds flavor and texture. You can also add quinoa or brown rice for extra nutrition and filling.

Other ways to customize your soup include:

  • Adding diced onions or garlic for extra flavor
  • Mixing in chopped fresh herbs like parsley or cilantro
  • Using different broth types, like chicken or vegetable, for flavor changes

Remember, the secret to a great cabbage and bean soup is to experiment. Find the perfect mix for you with a little creativity and basic ingredients. This way, you can enjoy a delicious, healthy meal anytime.

Serving Suggestions and Pairings

There are many ways to serve your slow cooker cabbage & bean soup. You can have it alone or with other dishes for a fuller meal. Try it with crusty bread, a green salad, or a sandwich for a healthy soup pairing.

For more meal ideas, pair your soup with roasted veggies, grilled meats, or quinoa or brown rice. Experiment to find your favorite way to enjoy it. You can also add parsley, lemon juice, or vegan sour cream for extra flavor.

  • Grilled chicken or fish for added protein
  • Roasted vegetables, such as broccoli or Brussels sprouts, for added nutrients
  • A side of whole grain bread or crackers for a satisfying crunch
  • A green salad with a light vinaigrette for a refreshing contrast

Try these meal ideas and slow cooker cabbage & bean soup serving suggestions to enjoy your soup in many ways. Make it a key part of your healthy eating routine.

Conclusion: Mastering Your Slow Cooker Soup

Creating the perfect slow cooker cabbage & bean soup is a journey. It’s about trying new things and making it your own. With each batch, you’ll find new ways to make it even better.

Don’t be shy to try different spices, add proteins, or change it up to make it your own. This way, you’ll create a dish that’s both comforting and uniquely yours.

The key to mastering slow cooker soup is to enjoy the process. Adjust it to your liking and relish the delicious outcome. This article has given you the tools to make a soup that’s not only healthy but also delightful. So, enjoy every bite!

FAQ

What are the health benefits of slow cooker cabbage and bean soup?

This soup is full of fiber and protein. These nutrients help with digestion and keep you full.

What are the time-saving advantages of making slow cooker cabbage and bean soup?

Cooking this soup in a slow cooker saves time. You can make it while doing other things.

Is slow cooker cabbage and bean soup a cost-effective meal solution?

Yes, it’s affordable. It uses cheap ingredients and makes a lot of food.

What are the essential ingredients for slow cooker cabbage and bean soup?

You need cabbage, beans, veggies, broth, and spices. These are the key ingredients.

How should I prepare the cabbage and beans for the soup?

Shred, chop, or leave cabbage in wedges. Cook beans as the recipe says.

How do I cook the slow cooker cabbage and bean soup?

First, sauté the veggies. Then add beans and broth. Cook on low for hours.

How can I season the slow cooker cabbage and bean soup to bring out the flavors?

Use spices like paprika, garlic powder, or chili powder. Adjust with broth, salt, or pepper as needed.

How can I store and reheat the slow cooker cabbage and bean soup?

Store it in the fridge for days or freeze. Reheat in the microwave or on the stove. Add broth or water if it’s too thick.

How can I customize the slow cooker cabbage and bean soup?

Add beans, tofu, or tempeh for protein. Try different spices or veggies to change the flavor.

How can I serve the slow cooker cabbage and bean soup?

Serve with bread, a salad, or sandwiches. Pair it with roasted veggies or grilled meats for a bigger meal.

Arepas Bread: A Flavorful Venezuelan Staple


cuisine in south america

What makes arepas bread so special and tasty? It’s the simple yet delicious ingredients like masarepa flour, salt, butter, warm water, and optional mozzarella cheese. As a gluten-free option, arepas are great for those with dietary needs. With about 104 calories per serving, they’re a healthy choice for exploring cuisine in South American.

Introduction to Arepas

Arepas bread is a beloved food in Venezuela and Colombia. Its popularity is spreading globally because of its unique taste and texture. Made from cornmeal, arepas can be enjoyed on their own or filled with different ingredients. They’re quick to make, with a prep time of about 20 minutes and a cook time of around 25 minutes, making them perfect for busy days.

Key Takeaways

  • Arepas bread is a traditional Venezuelan staple made from cornmeal.
  • Arepas are gluten-free and can be enjoyed plain or stuffed with various fillings.
  • Each serving of arepas contains approximately 104 calories.
  • Arepas can be cooked in various methods, including skillet, griddle, baked, grilled, or fried.
  • Arepas are a staple food in Venezuela and Colombia, and their popularity is growing worldwide.
  • Arepas can be filled with a variety of ingredients, including scrambled eggs, black beans, and chicken salad with avocado.

Understanding Arepas Bread: A Cultural Heritage

Arepas bread is a key food in Venezuelan and Colombian cuisine. It has a rich history and cultural importance. Indigenous peoples have made arepas for thousands of years, showing a long tradition.

In Venezuela and Colombia, arepas are filled with cheese, avocados, and meat. They are cooked on a clay griddle called a “budare.” Arepas symbolize south American food and cultural heritage.

Some popular types of arepas include:

  • Arepas de queso: filled with melted cheese
  • Arepas de avocado: filled with mashed avocado
  • Arepas de carne: filled with shredded meat

Arepas are now popular worldwide, found in places like Miami and New York. The name “arepa” comes from the indigenous word “erepa,” meaning corn. Exploring arepas reveals a rich cultural heritage and traditional bread-making.

In Colombia, arepas help small farmers make a living. In Venezuela, they boost the economy through small businesses. As arepas grow in popularity, they become a big part of traditional bread and south American food culture globally.

Essential Ingredients for Perfect Arepas

To make delicious arepas, focus on the right essential ingredients. The traditional cornmeal bread from cuisine in south American  needs just three things: cornmeal, water, and salt. It’s important to use pre-cooked, finely ground cornmeal for authentic traditional bread.

When picking cornmeal, choose a finely ground, pre-cooked type for arepas. You can also use gluten-free bread options, as arepas are naturally gluten-free. The mix of cornmeal to water is key, needing 2 cups of cornmeal, 2.5 cups of warm water, and 2 teaspoons of salt.

The water should be warm, between 90-105°F, for the best results. With these simple essential ingredients, you can make tasty arepas. They’re perfect with your favorite fillings. The secret to success is using quality ingredients and traditional methods from south American cuisine.

cuisine in south america _ cornmeal bread

By using the right essential ingredients and traditional methods, you can make delicious arepas. They’re a great way to enjoy the flavors and traditions of south American cuisine. Plus, their gluten-free bread option makes them accessible to everyone.

Required Kitchen Tools and Equipment

To make delicious arepas, you’ll need some basic kitchen tools and equipment. The right tools are key to making high-quality arepas bread, a staple in south American cuisine. Traditional Latin kitchens often use calderos, comals, and tostoneras for various dishes, including cornmeal bread.

For arepas, you’ll need a large bowl, a measuring cup, a wooden spoon, and a skillet or griddle. These tools help mix, shape, and cook your arepas perfectly. You can pick between traditional or modern equipment, like a cast-iron skillet or a non-stick griddle, for the perfect crispy crust.

Preparing your workspace is also important when making arepas. Make sure all your ingredients and equipment are within reach. A clean and organized workspace helps you stay focused. With the right tools, you can make delicious arepas for your favorite fillings, like cheese, meat, or vegetables.

kitchen tools

Consider getting specialized equipment, like a tostonera for flattening plantains or a pressure cooker to save time. Having the right equipment lets you make various dishes, including arepas. This way, you can explore the rich flavors and traditions of south American cuisine.

Step-by-Step Guide to Making Arepas Bread

To make Arepas bread, follow a simple guide. This traditional process from south American cuisine is easy to master. The key is using the right ingredients and cooking methods.

First, mix the dough with arepa flour, warm water, and salt. This forms the base of your bread. Then, shape the dough into small disks. The way you shape them will change their texture and look.

Mixing the Dough

Mixing the dough is key. You need 2 cups of arepa flour, 2.5 cups of warm water, and 1 teaspoon of salt. The mix should be smooth and lump-free. This step is vital in making Arepas bread.

Shaping Techniques

Shaping Arepas is an art that takes practice. Divide the dough into 10 parts and roll each into a ball. Then, flatten each ball into a disk, about 3.5 inches wide. The way you shape them will impact their texture and look.

Cooking Methods

You can cook Arepas in several ways: frying, baking, or grilling. Each method changes the texture and flavor. Frying makes them crispy, baking softer, and grilling adds a smoky taste. The cooking method affects the taste and texture of your bread.

Arepas bread cooking methods

Here’s a quick look at the cooking methods and their effects:

Cooking Method Texture Flavor
Frying Crispy exterior Golden brown
Baking Soft texture Mild flavor
Grilling Smoky flavor Charred texture

By following this guide, you can make delicious Arepas at home. With the right ingredients, cooking methods, and shaping, you can enjoy authentic south American cuisine.

Common Mistakes to Avoid When Making Arepas

When making arepas, it’s key to know common mistakes. Troubleshooting these can help you make the perfect arepa. Overmixing the dough makes arepas dense and tough. Using the wrong cornmeal can also lead to a lack of flavor and texture.

To avoid these mistakes, use the right cornmeal and mix the dough just until it comes together. Cook the arepas for the right time. Traditional bread making techniques, like letting the dough rest, can also help. By following these tips, you can make delicious arepas for your favorite south American cuisine.

Other mistakes to avoid include:

  • Using too much water, which can result in a sticky dough
  • Not kneading the dough enough, which can lead to air pockets and uneven texture
  • Cooking the arepas for too long, which can cause them to become dry and crispy

arepas common mistakes

Traditional and Modern Filling Options

Arepas offer endless filling choices. You can pick from classic or new options like cheese, meat, veggies, and beans. They’re a big deal in south American food, loved for their flexibility. The cornmeal bread is perfect for any filling, making arepas great for any meal.

In Venezuela, arepas are filled with cheese, meat, or veggies. But now, you can also find them with avocado, hummus, and grilled veggies. The secret to a great arepa is mixing the filling’s flavors with the crispy cornmeal.

Some favorite fillings include:

  • Cheese: a classic Venezuelan choice, often queso fresco or mozzarella
  • Meat: shredded chicken, beef, or pork, seasoned with spices and herbs
  • Vegetables: grilled or sautéed, like bell peppers, onions, and mushrooms
  • Beans: black, kidney, or pinto beans, cooked with spices and herbs

Whether you like traditional or new fillings, arepas are tasty and versatile. They’re perfect for any meal, thanks to their crispy cornmeal and many fillings. Arepas are a great choice for those looking to try something new.

In south America, arepas are a beloved food, and they’re gaining fans worldwide. Their cornmeal bread and fillings make them a hit with food lovers and health enthusiasts. Why not make arepas at home and try different fillings to find your favorite?

Filling Option Traditional or Modern Vegan/Vegetarian
Cheese Traditional No
Meat Traditional No
Vegetables Both Yes
Beans Both Yes
Avocado Modern Yes

Storing and Reheating Your Arepas

To keep your arepas fresh and tasty, follow the right storage and reheating tips. Arepas, a cornmeal bread, are key in south American cuisine. Storing them right keeps their flavor and texture intact.

You can store arepas at room temperature for 2-3 days. In the fridge, they last up to 5 days. For longer storage, freeze them for 3 months. Just put them in an airtight container or plastic bag in the freezer.

Reheating Methods

To reheat arepas, use a toaster, oven, or microwave. Here’s how to do it right:

  • Toaster: Reheat arepas for 2-3 minutes, until crispy and golden.
  • Oven: Preheat to 350°F (180°C). Reheat for 5-7 minutes, until crispy and golden.
  • Microwave: Reheat for 20-30 seconds, until warm and soft.

By storing and reheating arepas correctly, you can enjoy them longer. These tips ensure your cornmeal bread stays fresh and delicious. Whether for a quick snack or a meal, these methods will help.

Always check arepas for spoilage before eating. Reheat them to 165°F (74°C) for food safety.

Storage Method Storage Time
Room Temperature 2-3 days
Refrigerator Up to 5 days
Freezer Up to 3 months

Health Benefits of Gluten-Free Arepas Bread

Exploring south American cuisine reveals the health perks of gluten-free Arepas bread. It’s made from cornmeal, a nutritious alternative to regular bread. Arepas bread is packed with nutrients, helping with digestion and keeping you energized.

Choosing gluten-free Arepas bread supports a healthy diet. It helps avoid being overweight and protects your immune system from gluten’s negative effects. It’s also great for those with gluten intolerance or sensitivity, as it’s a tasty, safe bread option.

Some key benefits of gluten-free Arepas bread include:

  • Rich in fiber and protein
  • Low in calories
  • Supports healthy digestion
  • Provides sustained energy

Adding gluten-free Arepas bread to your diet can greatly improve your health. Its health benefits and tasty flavor make it a smart choice for a healthier lifestyle. Enjoy Arepas bread for any meal or snack, knowing you’re making a nutritious choice.

Regional Variations and Special Recipes

Exploring arepas reveals a world of regional flavors and special recipes. Each area, from Venezuela to Colombia, adds its own twist to this cornmeal bread. Venezuelan arepas are thicker and fluffier, while Colombian ones are thinner and often plain or topped.

Masarepa, a pre-cooked corn flour, is key to making arepas. With just masarepa, water, and salt, you can make a delicious arepa. Whether you want a classic recipe or something new, there’s a wide range of arepa options.

  • Venezuelan-style arepas, which are often filled with cheese, meat, or vegetables
  • Colombian-style arepas, which are typically served with toppings such as chorizo, chicharron, or avocado
  • Sweet arepas, which are made with sugar and filled with ingredients like Nutella or fruit

These are just a few examples of the many regional variations and special recipes you can try. With a little experimentation and creativity, you can create your own unique arepa recipes that showcase the flavors and ingredients of cuisine in south American.

Conclusion: Mastering the Art of Arepas Making

Making authentic arepas is a fun and tasty journey into South American cooking. You can now make cornmeal bread that will wow everyone. It’s all about the right techniques and ingredients.

We’ve looked at arepas’ history, cultural importance, and how they’ve evolved. You know how to make the dough and try different fillings. Now, you’re ready to start making arepas. Remember, it takes practice, patience, and a love for new flavors.

So, get your ingredients ready and start cooking. Let the smell of fresh arepas fill your home. Enjoy making these tasty cornmeal treats and share them with your loved ones. Happy arepas making!

FAQ

What is Arepas bread?

Arepas bread is a traditional Venezuelan staple made from cornmeal. It’s gluten-free and can be enjoyed plain or filled with various ingredients.

What is the cultural significance of Arepas bread?

Arepas bread holds a special place in Venezuela and Colombia. It’s a staple food, often filled with different ingredients. This reflects the local cuisine and traditions.

What are the essential ingredients for making Arepas bread?

To make Arepas bread, you need cornmeal, water, and salt. The cornmeal must be pre-cooked and finely ground.

What kitchen tools and equipment are needed to make Arepas bread?

You’ll need a large bowl, a measuring cup, a wooden spoon, and a skillet or griddle. The right tools are key to making great Arepas bread.

What is the step-by-step process for making Arepas bread?

Making Arepas bread involves mixing the dough, shaping it, and cooking it. You can fry, bake, or grill them.

What are the common mistakes to avoid when making Arepas bread?

Avoid overmixing the dough and using the wrong cornmeal. Also, don’t cook the Arepas for too long. Following the recipe and using the right techniques can help.

What are the traditional and modern filling options for Arepas bread?

Arepas bread can be filled with many things. Traditional options include cheese, meat, and vegetables. Modern and vegetarian/vegan options are also popular.

How should Arepas bread be stored and reheated?

To keep Arepas bread fresh, store and reheat it properly. This includes freezing, thawing, and using the right reheating methods.

What are the health benefits of Arepas bread?

Arepas bread is gluten-free. It’s nutritious, aids digestion, and provides sustained energy.

What are the regional variations and special recipes for Arepas bread?

Arepas bread has many regional variations and special recipes. These include traditional and modern twists, as well as sweet and savory options.

Delicious Creamy Zucchini & Pea Soup (Dairy-Free)


Creamy Zucchini & Pea Soup (Dairy-Free)

Looking for a healthy, creamy soup without dairy? Try our creamy zucchini & pea soup. It’s a vegan delight that’s packed with vitamins and minerals. This soup is great for a nutritious meal, serving 4 people with about 236 calories each.

Key Takeaways

  • You can make a delicious and healthy creamy zucchini & pea soup without dairy.
  • This vegan soup is a great option for a healthy dairy-free recipe.
  • The recipe serves 4 people and contains approximately 236 calories per serving.
  • The soup is rich in vitamins and minerals, including vitamin A, vitamin C, and potassium.
  • You can store the soup in the fridge for up to 5 days or freeze it for up to 3 months.
  • The recipe requires only 7 ingredients, including salt and pepper, and can be prepared in just 5 minutes.

The Benefits of Making Dairy-Free Creamy Soups

Exploring dairy-free cooking opens up a world of health benefits. Dairy-free creamy soups are a tasty and nutritious choice. They’re made with ingredients like zucchini and peas, which add flavor and nutrients.

These soups are packed with fiber, protein, and healthy fats. A single serving can meet a big part of your daily needs. This makes them a great option for a healthy meal.

Zucchini and peas are excellent for these soups because they’re full of vitamins and minerals. They also have antioxidants, which are good for your health. Plus, they’re easy to prepare, ready in under 30 minutes.

  • Reduced risk of heart disease and type 2 diabetes
  • Lower calorie and fat content compared to traditional soups
  • Higher fiber and protein content, making them more filling and satisfying
  • Increased antioxidant intake due to the use of nutrient-dense ingredients like zucchini and peas

Dairy-free creamy soups are a healthy choice for your meals. They’re full of nutrients and taste great. They’re perfect for anyone wanting to eat better and feel better.

Nutrient Amount per serving
Calories 354
Carbohydrates 42g
Protein 11g
Fiber 9g

Essential Kitchen Equipment for Your Soup

To make a delicious zucchini and pea soup, you need some key kitchen equipment. You’ll need a blender to puree the soup, a saucepan for cooking, and utensils like a spoon and spatula for stirring and serving.

Here are the main tools you’ll need:

  • A high-speed blender to puree the soup to the right consistency
  • A large saucepan to cook the zucchini, peas, and other ingredients
  • Utensils such as a spoon, spatula, and whisk to stir and mix the ingredients

The right kitchen equipment greatly improves your soup’s quality and texture. A good blender ensures a smooth, creamy soup. A saucepan helps cook ingredients evenly and prevents burning. Utensils like a spoon and spatula make serving easy.

kitchen equipment

Consider getting other kitchen equipment too. A food processor or immersion blender can make cooking easier and faster.

Equipment Description
Blender Used to puree the soup to the desired consistency
Saucepan Used to cook the zucchini, peas, and other ingredients
Utensils Used to stir and serve the soup

Ingredients for Creamy Zucchini & Pea Soup (Dairy-Free)

To make this tasty and healthy soup, you’ll need several ingredients. These include base ingredients, dairy-free options, and garnishes. The main ingredients are zucchini, peas, onion, garlic, and dairy-free choices like coconut milk or almond milk. You’ll also need vegetable stock, canned coconut cream, and spices for flavor.

The base ingredients are the soup’s foundation. They provide the taste and texture. You’ll need zucchinis, peas, onion, and garlic. Also, vegetable stock and canned coconut cream add creaminess. For dairy-free options, use coconut milk or almond milk.

You can also add garnishes to make the soup taste better and look great. Try fresh herbs like parsley or basil, or a sprinkle of nutritional yeast for a cheesy taste. Other garnishes include:

  • Fresh herbs, such as parsley or basil
  • Nutritional yeast
  • Chopped nuts or seeds
  • Diced vegetables, such as bell peppers or carrots

With these ingredients, you can make a delicious and healthy creamy zucchini and pea soup. It’s perfect for any time.

Preparing Your Vegetables

Preparing vegetables is key to a tasty creamy zucchini and pea soup. You’ll need to wash, chop, and sauté them. This brings out their flavors and textures. First, wash the zucchinis and peas to get rid of dirt.

Then, chop the zucchinis into small pieces and put them aside. Next, heat some oil in a pan. Start sautéing the chopped onion until it’s translucent.

Add the chopped garlic and cook for a minute. Then, add the chopped zucchinis and cook until they brown. This step enhances the zucchinis’ sweetness and the soup’s depth.

preparing vegetables

After the zucchinis brown, add the peas and cook for a minute more. It’s important to cook the vegetables until they’re tender but crisp. This keeps their flavors and textures fresh, making the soup more enjoyable.

The Secret to Achieving Creaminess Without Dairy

To get the perfect creaminess in your dairy-free soup, focus on two key things: plant-based thickeners and blending techniques. These elements help you create a rich, creamy texture that’s just like traditional dairy-based soups.

There are many plant-based thickeners to choose from. Coconut milk, almond milk, and cashew cream are popular ones. You can mix these with ingredients like potatoes and zucchini for a creamy, velvety texture.

Best Plant-Based Thickeners

  • Coconut milk: adds a rich and creamy texture
  • Almond milk: provides a light and silky texture
  • Cashew cream: offers a creamy and indulgent texture

Blending Techniques for Smoothness

For the perfect blend, you need the right blending techniques. High-speed blending is key for a smooth, creamy texture. Use a high-speed blender, like a Vitamix or Blendtec, to blend your ingredients until they’re smooth.

creaminess

By mixing plant-based thickeners with blending techniques, you can make a dairy-free soup that’s creamy and delicious. Try different thickeners and blending methods to find what you like best.

Thickener Texture Blending Technique
Coconut milk Rich and creamy High-speed blending
Almond milk Light and silky Immersion blending
Cashew cream Creamy and indulgent High-speed blending

Step-by-Step Cooking Method

To make the creamy zucchini and pea soup, start by sautéing the veggies. Use olive oil to cook the zucchini, onion, and garlic until they’re soft. Then, add the broth and let it simmer.

After that, add the potatoes and cook for 15-20 minutes until they’re tender. Use a blender to puree the soup in batches. Or, you can use an immersion blender right in the pot.

Here’s a quick guide to cooking the soup:

  • Sauté the vegetables in olive oil until tender
  • Add the broth and bring to a simmer
  • Add the potatoes and cook until tender
  • Puree the soup in batches until desired consistency is reached

cooking method of Creamy Pea & Zucchini Soup

By following this guide, you can make a tasty and creamy zucchini and pea soup. Don’t forget to adjust the seasoning and texture to your taste. Serve it with your favorite garnishes and enjoy!

Seasoning Your Soup to Perfection

To enhance the flavors of your creamy zucchini and pea soup, seasoning is key. You aim to boost the taste without drowning out the zucchini and peas’ natural flavors. Start with a pinch of salt and a few grinds of pepper, then adjust to your liking.

Choosing the right herb and spice combinations is important. A sprinkle of dried basil or a pinch of paprika can enrich your soup. Feel free to try other herbs like thyme or rosemary to find your favorite mix.

Don’t forget to adjust salt and pepper levels. A pinch of salt can highlight the zucchini and peas’ flavors, while pepper adds a bit of heat. Remember, it’s easier to add more seasoning than it is to remove it, so start small and taste as you go.

For the best seasoning, taste your soup often and tweak as needed. Adding a squeeze of fresh lemon juice or a sprinkle of grated ginger can also enhance the flavor. By following these tips, you’ll create a creamy zucchini and pea soup that’s both delicious and well-balanced.

Serving Suggestions and Garnishing Ideas

When serving your creamy zucchini and pea soup, think about a few key elements. Serving suggestions can really enhance the presentation and enjoyment. Try serving it with a fresh green salad or crusty bread. These add to the flavors and textures.

Garnishing ideas can also make the dish more elegant. Add fresh herbs like parsley or basil, or a dollop of dairy-free cream. This adds color and creaminess. You can also try different toppings like toasted nuts or seeds for crunch.

Some great side dishes for creamy zucchini and pea soup include:

  • Roasted vegetables, such as asparagus or Brussels sprouts
  • Grilled cheese sandwiches or paninis
  • Fresh fruit or cut veggies with hummus

For creative toppings, try diced ham or bacon, grated cheese, or salsa or pesto. The goal is to find what you like best. With a bit of creativity, your soup can become a memorable meal.

Storage and Reheating Guidelines

Proper storage is key to keeping your creamy zucchini and pea soup fresh and safe. You can store it in the fridge for up to 5 days or freeze it for 3 months. Always check the soup for spoilage before reheating.

To reheat, use the stovetop or microwave. For the stovetop, heat it gently over low heat, stirring often. For the microwave, heat in short bursts, stirring between each one, until it’s hot.

Here are some important guidelines:

  • Always check the soup for any signs of spoilage before reheating.
  • Reheat the soup to an internal temperature of at least 165°F (74°C) to ensure food safety.
  • Use a food thermometer to check the temperature of the soup.
  • Never leave the soup at room temperature for more than 2 hours.

By following these storage and reheating guidelines, you can enjoy your soup for longer while keeping it safe and tasty.

Remember, food safety is always first when storing and reheating your soup. If you’re unsure, it’s safer to throw it away.

Storage Method Storage Duration
Refrigerator Up to 5 days
Freezer Up to 3 months

Troubleshooting Common Issues

When making creamy zucchini and pea soup, you might run into some common problems. Troubleshooting these issues is key to getting the perfect soup. One big issue is texture problems, often due to veggies being undercooked or overcooked.

To fix texture problems, try changing the cooking time or adding thickeners like cream or flour. If the flavor is off, it might be because of too little seasoning or spices. To fix this, just add more herbs or spices to taste.

  • Adjusting the seasoning to balance the flavor
  • Adding thickeners to achieve the right consistency
  • Blending the soup to the right texture

By using these tips, you can solve common problems and make a delicious, creamy zucchini and pea soup.

Conclusion

This creamy zucchini and pea soup is a great choice for those avoiding dairy. It’s packed with fiber, vitamins, and minerals, making it a healthy option. You can enjoy it as a main dish or a side, adding variety to your meals.

Creating this soup at home is easy, thanks to the simple steps in this guide. You can use an Instant Pot or cook it on the stovetop. Either way, you’ll get a creamy, tasty soup that will impress anyone.

Starting a dairy-free diet can be exciting, and this recipe is a great place to begin. It opens up a world of plant-based soups that are both delicious and good for you. Try out this soup and see how it can make your meals more enjoyable and nutritious.

FAQ

What are the health benefits of making dairy-free creamy soups?

Dairy-free creamy soups are good for your health. They can lower your risk of heart disease, type 2 diabetes, and some cancers. Enjoying creamy soups without dairy is a healthier choice.

Why are zucchini and peas good choices for dairy-free soups?

Zucchini and peas are great for soups because they’re full of nutrients. They add a creamy texture and lots of vitamins and minerals. Plus, they’re packed with good plant compounds.

What essential kitchen equipment do I need to make creamy zucchini and pea soup?

You’ll need a blender, a saucepan, and basic tools to make this soup. The right equipment ensures the perfect texture and taste.

What ingredients are required for creamy zucchini and pea soup?

You’ll need zucchini, peas, broth, and a dairy-free milk or cream. Optional garnishes can also enhance the flavor and look of the soup.

How do I properly prepare the vegetables for the soup?

Preparing the veggies is key. Wash, chop, and sauté them to bring out their flavors and textures.

What is the secret to achieving creaminess without dairy?

Use plant-based thickeners and blend the soup until smooth. Pureeing and emulsifying can make it rich and creamy.

How do I properly season the soup to enhance the flavors?

Seasoning is important to highlight the zucchini and peas’ natural flavors. Try different herbs and spices, and adjust salt and pepper to taste.

What are some serving suggestions and garnishing ideas for creamy zucchini and pea soup?

Serve with sides like crusty bread or a fresh salad. Get creative with garnishes like toasted nuts, herbs, or a drizzle of plant-based cream.

How should I store and reheat the creamy zucchini and pea soup?

Store it in an airtight container in the fridge for up to 4 days. Reheat gently on the stovetop or in the microwave, avoiding overheating.

How can I troubleshoot any issues that may arise when making the soup?

For texture or flavor issues, try different blending techniques or add more seasoning. This will help you get the perfect soup.

Delicious Slow Cooker Tomato & Red Pepper Soup


Slow Cooker Tomato & Red Pepper Soup

Can you make a tasty slow cooker tomato & red pepper soup at home with little effort? This soup is a great comfort food for any season. Thanks to a slow cooker, you can whip up a healthy tomato soup that’s easy and full of flavor. It’s perfect for a quick and simple red pepper soup.

Introduction to Slow Cooker Tomato & Red Pepper Soup

This slow cooker tomato & red pepper soup is not only tasty but also healthy. You can make this easy red pepper soup with a few ingredients and basic tools. The slow cooker does all the work, making it simple to follow.

Key Takeaways

  • You can create a delicious slow cooker tomato & red pepper soup at home with minimal effort.
  • This slow cooker tomato & red pepper soup is a perfect comfort food for any time of the year.
  • The slow cooker makes it easy to prepare a healthy tomato soup recipe.
  • This easy red pepper soup is packed with flavor and antioxidants.
  • You can make this slow cooker tomato & red pepper soup with just a few ingredients and some basic equipment.
  • The cost per portion is under £1.50, making it an affordable option.

Why Slow Cooker Tomato & Red Pepper Soup Is Your New Favorite Comfort Food

Exploring slow cooker comfort food opens up a world of warmth and ease. It’s about making healthy soup recipes that feed both your body and soul. A slow cooker makes it simple to whip up easy soup recipes for any season.

Slow cooking brings out the best in ingredients, making your soups tasty and full of nutrients. Roasted red peppers are packed with Vitamin A and beta-carotene. Roasted tomatoes, on the other hand, are rich in lycopene, a key antioxidant for health.

Some of the benefits of slow cooking include:

  • Easy to prepare and cook
  • Nourishing and healthy
  • Perfect for busy lifestyles

Adding slow cooker comfort food to your diet can greatly improve your health. With a bit of creativity, you can make many healthy soup recipes that are both tasty and simple to prepare.

Essential Equipment for Perfect slow Cooker Soup

To make a tasty slow cooker soup, you need the right tools. The size and settings of your slow cooker matter a lot. A bigger slow cooker can hold more ingredients, while a smaller one is better for fewer servings. The cooking time and soup texture can change based on the slow cooker settings, like low or high.

You’ll need some basic items for slow cooker soup. These include a slow cooker, a blender or hand blender, and utensils like spoons and ladles. The size of your slow cooker depends on how many people you’re serving. For example, a 6-quart slow cooker is great for making soup for 6 people.

Here are some key pieces of equipment you’ll need:

  • A slow cooker with adjustable settings
  • A blender or hand blender for pureeing the soup
  • Utensils like a spoon and ladle

slow cooker equipment

You might also want some extra equipment to make slow cooking better. Consider a slow cooker liner, a thermometer, and a timer. With the right tools and a bit of practice, you’ll be whipping up delicious slow cooker soups in no time.

Equipment Description
Slow Cooker A kitchen appliance that cooks food at a low temperature for a long period of time
Blender or Hand Blender A kitchen appliance used to puree or blend food
Utensils Spoons, ladles, and other tools used to prepare and serve food

Ingredients Overview and Preparation tips

To make a tasty slow cooker tomato and red pepper soup, you need the right ingredients. Fresh tomatoes are key for a rich, flavorful soup. Experts say, “Large Vine Tomatoes – Fresh tomatoes will absolutely deliver the best flavour to this creamy tomato and pepper soup.”

You’ll also need red peppers, onions, and garlic for a classic red pepper soup.

Here are some key ingredients to include in your slow cooker soup ingredients list:

  • 4 red peppers, halved and deseeded
  • 1 red onion, roughly chopped
  • 6 cloves of garlic, peeled and whole
  • Fresh thyme and rosemary for added flavor

When chopping onions and garlic, make sure to do it finely. This helps release their flavors. Roasting the red peppers in the oven for about 15 minutes can also enhance their sweetness. With these ingredients and tips, you can make a delicious and healthy slow cooker tomato and red pepper soup.

slow cooker soup ingredients

Step-by-Step Recipe: Making your Slow Cooker Tomato & Red Pepper Soup

To start, prepare your veggies. You’ll need 1.2 kg of ripe tomatoes, 5 cloves of garlic, and 130 grams of red onion. Preheat your oven to 350 degrees. Place the veggies on a sheet pan, drizzle with olive oil, and season with salt and pepper.

Roast in the oven for 45 minutes. This will make them tender and slightly charred.

Now, layer the ingredients in your slow cooker. Add the roasted veggies, 1 can of San Marzano tomatoes, and 1 jar of roasted red peppers. Mix in 1 teaspoon of sugar, 2 teaspoons of salt, and 2 teaspoons of mixed herbs for flavor. Pour in 400 ml of boiling water and add 1 vegetable stock cube for extra flavor.

slow cooker recipe

Cook the soup on high for about 3 hours or on low for 6-7 hours. Blend the soup to your liking. Stir in 1/8 cup of parmesan cheese and 1/8 cup of fresh basil leaves. This tomato soup recipe is perfect for a comforting meal. Serve it with a grilled cheese sandwich or Angelic Rye Bread Crisps.

The red pepper soup recipe adds a sweet and smoky flavor. It’s a unique twist on traditional tomato soup.

For a chunky texture, blend only half of the soup. Mix it back with the unblended portion. You can also add one or two red peppers to make a red pepper and tomato soup variant. This slow cooker recipe is easy to make and great for any occasion.

Custom Options and Flavor Variations

Slow cooker soup variations are endless. You can make your tomato soup unique by adding different veggies, herbs, and spices. For instance, add basil for a roasted tomato basil soup or lentils for a hearty tomato lentil soup.

Try using different peppers, like red pepper soup, for a smoky taste. You can also add jalapeno for spice or Worcestershire sauce for depth.

Here are some ideas for customizing your slow cooker soup:

  • Add some chopped onions or garlic for added flavor
  • Mix in some coconut milk or cream for a creamy texture
  • Try using different types of tomatoes, such as cherry or grape tomatoes, for a burst of flavor
  • Experiment with various spices, such as cumin or paprika, to add a smoky flavor

slow cooker soup variations

With these options, you can make a slow cooker soup that fits your taste and diet. Whether you like classic tomato soup or spicy red pepper soup, the slow cooker makes it easy to cook a delicious meal.

Slow Cooker Soup Variation Ingredients Prep Time Cook Time
Tomato Soup Tomatoes, onions, garlic, basil 10 minutes 6 hours
Red Pepper Soup Red peppers, tomatoes, onions, garlic 15 minutes 8 hours
Tomato Lentil Soup Tomatoes, lentils, onions, garlic, basil 20 minutes 8 hours

Nutritional and Dietary Information

Slow cooker soup nutrition is packed with benefits. Tomato soup and red pepper soup are great examples. A single serving, about 1 cup, has just 110 calories. This makes it perfect for those watching their weight.

This soup is also full of vitamins, minerals, and fiber. These are key for a healthy diet.

The mix of slow cooker, tomato, and red pepper soups is a nutrient-rich meal. It’s tasty and good for your health. With 201 kcal per serving, it’s a low-calorie, high-nutrient choice. It has 5g of dietary fiber, which is good for digestion and blood sugar.

This soup is a great source of vitamin A and vitamin C. It also has 956 mg of potassium. Potassium helps keep blood pressure healthy and supports heart health.

Looking for a healthy meal or more slow cooker, tomato, and red pepper soup nutrition? This recipe is a great pick.

Some key nutritional benefits of this soup include:

  • Low calorie count: 201 kcal per serving
  • High dietary fiber content: 5g per serving
  • Rich in essential vitamins and minerals: vitamin A, vitamin C, potassium, and more
  • Supports healthy digestion and blood sugar levels

Storage Solutions and Reheating Methods

After making your slow cooker soup, it’s key to store it right. This keeps the taste and nutrients in. Let the soup cool down, then put it in an airtight container. It will stay fresh in the fridge for 3-4 days.

For reheating, you can use your slow cooker or a microwave. If using a microwave, heat it in short bursts, stirring each time. This ensures it’s hot enough. For the slow cooker, just put the soup in and heat it on low for a few hours.

Here are some extra tips for storing and reheating your soup:

  • Use airtight containers to avoid contamination and spoilage
  • Label and date the containers for easy tracking
  • Freeze the soup for up to 2-3 months for longer storage

Serving Suggestions and Perfect Pairings

There are many ways to make your slow cooker soup even better. Try adding fresh herbs like basil or parsley for a bright taste. You can also top it with crusty bread or parmesan cheese for extra flavor and texture. For a heartier meal, pair it with grilled cheese or a green salad.

Some great slow cooker soup serving suggestions include warm bread like a baguette or whole grain loaf. You can also serve it with a simple green salad or roasted veggies. The goal is to enhance the soup’s flavors without overwhelming them. A bit of creativity can turn your soup into a full, tasty meal.

Here are some soup pairing ideas:

  • Garnish with fresh herbs, such as basil or parsley
  • Serve with a side of crusty bread or crackers
  • Pair with a simple green salad or a side of roasted vegetables
  • Top with a sprinkle of parmesan cheese or a dollop of sour cream

Exploring different serving suggestions and pairings can help you find the perfect way to enjoy your slow cooker soup. Whether you’re craving something simple or something fancy, there’s a combination that will satisfy your taste buds.

Serving Suggestions Pairing Ideas
Fresh herbs, such as basil or parsley Crusty bread or crackers
Crusty bread or crackers Simple green salad or roasted vegetables
Parmesan cheese or sour cream Grilled cheese or a side of fruit

Seasonal Adaptations for Year-Round Enjoyment

Exploring slow cooker soups reveals the power of seasonal adaptations. These changes make your dishes perfect for any time of year. By using fresh, seasonal ingredients, you can craft a slow cooker soup that’s both tasty and seasonally relevant.

In summer, fresh garden tomatoes make a cool slow cooker soup. Winter calls for warm spices and hearty veggies for a cozy soup seasonal variation. The variety is vast, and a slow cooker lets you try many slow cooker soup seasonal adaptations to find your favorite.

Here are some tips for adjusting your soup to match the seasons:

  • Spring is the time for fresh herbs and citrus for a zesty flavor.
  • Winter is for warm spices and hearty veggies for a comforting soup.
  • Summer is when fresh garden tomatoes and basil make a light soup.
  • Fall is for squash and root veggies for a hearty soup.

By embracing soup seasonal variations and slow cooker soup seasonal adaptations, you can enjoy your favorite soups all year. Each season brings a unique flavor and character. So, don’t hesitate to experiment with new ingredients and spices to make your ideal slow cooker soup for any season.

Season Ingredients Flavor Profile
Spring Fresh herbs, citrus Bright, refreshing
Summer Fresh garden tomatoes, basil Light, refreshing
Fall Squash, root vegetables Hearty, comforting
Winter Warm spices, hearty vegetables Comforting, nourishing

Troubleshooting Common Soup Making Challenges

Making soup can sometimes lead to common problems. Slow cooker soup troubleshooting is key to fixing these issues. It helps ensure your soup is tasty and satisfying.

Dealing with soup making challenges like texture, flavor, and timing is essential. Being flexible and adaptable in the kitchen is vital. Here are some tips to help you troubleshoot common problems:

  • Check the consistency of your soup and adjust the cooking time or liquid levels as needed.
  • Taste and adjust the seasoning regularly, adding more salt, pepper, or herbs to taste.
  • Plan ahead and manage your time wisely, allowing for sufficient cooking and preparation time.

By following these tips, you can make a delicious and healthy soup. Remember to stay calm and patient. Don’t be afraid to experiment and try new things. It’s all part of the soup making challenges and rewards of cooking!

Common Soup Making Challenges Solutions
Texture issues Adjust cooking time or liquid levels
Seasoning adjustments Taste and adjust seasoning regularly
Time management Plan ahead and manage time wisely

With these tips and a little practice, you’ll become a soup-making expert. You’ll be able to overcome any soup making challenges that come your way. Happy cooking!

Conclusion

As winter arrives, the slow cooker tomato & red pepper soup is a perfect choice. It warms you up from the inside. This recipe combines the sweetness of tomatoes with the gentle heat of red peppers, making it a treat for your senses.

Using a slow cooker makes it easy to make a healthy soup recipe full of flavor and nutrients. The slow cooking blends the ingredients together, creating a smooth texture and rich flavor. You’ll want to have more.

This easy soup recipe is great for a cozy meal or a starter for a gathering. It’s sure to become a favorite in your home.

FAQ

What are the benefits of slow cooking tomato and red pepper soup?

Slow cooking makes the soup taste better and more nutritious. It helps the veggies break down, releasing their flavors. This makes the soup rich and comforting.

What equipment is needed to make the perfect slow cooker tomato and red pepper soup?

You’ll need a slow cooker that’s the right size. Also, a blender or hand blender for a smooth soup. Optional tools like immersion blenders can also help.

What are the key ingredients in the slow cooker tomato and red pepper soup?

The main ingredients are tomatoes, red peppers, onions, and garlic. Using fresh, high-quality ingredients is key for a delicious soup.

How do I customize the slow cooker tomato and red pepper soup to my taste preferences?

You can add different veggies, herbs, and spices to make it your own. The slow cooker makes it easy to try new flavors.

What are the nutritional benefits of the slow cooker tomato and red pepper soup?

The soup is full of vitamins, minerals, and antioxidants from the tomatoes and peppers. It’s a healthy choice, using fresh ingredients.

How do I store and reheat the slow cooker tomato and red pepper soup?

Store it in airtight containers in the fridge for up to 5 days. When reheating, make sure it’s hot enough to be safe.

What are some suggestions for serving and pairing the slow cooker tomato and red pepper soup?

Try it with different garnishes, side dishes, and bread. This makes for a complete and satisfying meal.

How can I adapt the slow cooker tomato and red pepper soup for different seasons?

Use fresh, seasonal ingredients for a soup that’s perfect all year. The slow cooker lets you try new flavors easily.

What are some common challenges in making the slow cooker tomato and red pepper soup, and how can I overcome them?

Challenges might include texture, seasoning, or time. But with the right tips, you can make a delicious and healthy soup.

Whip Up a Comforting Carrot & Red Lentil Soup


Carrot & Red Lentil Soup

Why is carrot & red lentil soup great for a healthy meal? It’s full of flavor and good for you. You can make this vegetarian soup in 30 minutes, perfect for a busy day.

This soup is easy to make and full of nutrients. It has 437 kcal, 27.8g of protein, and 26.9g of fiber per serving. You can also adjust it to your liking, making it perfect for meal prep.

Key Takeaways

  • You can prepare this carrot & red lentil soup in just 30 minutes.
  • This homemade soup recipe is packed with nutrients, including 27.8g of protein and 26.9g of fiber per serving.
  • The soup is highly customizable, making it a great option for meal prep and vegetarian diets.
  • With 437 kcal per serving, this healthy soup is an excellent choice for a quick and nutritious meal.
  • You can store this soup in the fridge for up to 5 days or freeze it for up to 1 month.
  • This carrot & red lentil soup is a great source of essential vitamins and minerals, including vitamin A, calcium, and iron.

The Magic of Carrot & Red Lentil Soup

Exploring healthy soup ideas, you’ll find carrot and lentil soup is a hit. This mix of carrots and lentils is packed with nutrients. It’s full of fiber, protein, and vitamins, making it great for any time of year.

Looking for a cozy meal in winter or a cool soup in summer? Carrot and red lentil soup fits the bill. You can tweak the flavor to match your mood, making it perfect for any season. Add smoked paprika or turmeric for a warm, cozy taste.

Health Benefits of This Nutritious Combination

Carrots and lentils are a powerhouse of fiber, protein, and vitamins. They boost digestion, energy, and immunity. With just 173 kcal per serving, it’s a filling, healthy choice.

Why This Soup Is Perfect for Any Season

Carrot and red lentil soup is incredibly versatile. Enjoy it hot in winter or cold in summer. You can also play with spices to match your taste.

Understanding the Flavor Profile

The soup’s flavor is a sweet and savory mix. Carrots bring sweetness, while lentils add a nutty taste. You can tweak it with spices like cumin or paprika.

This soup is also high in fiber and vitamins like A and potassium. It’s a top pick for a healthy, tasty meal.

Essential Ingredients for Your Soup

To make a delicious Carrot & Red Lentil Soup, you need a few key ingredients. These include carrots, lentils, onions, garlic, and vegetable broth. You can also add your favorite spices and herbs. Using fresh and high-quality ingredients is important for a great soup.

For an easy soup recipe, keep the ingredients simple. You’ll need 3 carrots, 1 cup of lentils, 1 onion, 2 cloves of garlic, and 4 cups of vegetable broth. Adding tomato paste, olive oil, and lemon juice can enhance the flavor. This nutritious soup is not only tasty but also full of nutrients and fiber.

Here are the essential ingredients you will need:

  • Carrots: 3
  • Lentils: 1 cup
  • Onion: 1
  • Garlic: 2 cloves
  • Vegetable broth: 4 cups

To make a flavorful soup, add spices and herbs like cumin, turmeric, and parsley. Try different combinations to find your favorite.

Remember, the key to a great soup is using fresh and high-quality ingredients. Choose the best produce and don’t be afraid to experiment with spices and herbs. With these ingredients, you can make a delicious Carrot & Red Lentil Soup for any occasion.

Kitchen Equipment You’ll Need

To make a tasty and healthy soup for cold weather, like Carrot & Red Lentil Soup, you’ll need some basic kitchen tools. A big pot is essential for cooking the soup. You can also use a blender or immersion blender to puree it to your liking. This is great for meal prep, as you can cook a lot and save it for later.

Having the right tools is key when cooking a healthy soup. You’ll need a large pot and a blender, plus measuring cups and spoons. You might also consider a slow cooker or Instant Pot for quicker cooking. These tools are perfect for busy days.

  • Large pot
  • Blender or immersion blender
  • Measuring cups and spoons
  • Slow cooker or Instant Pot (optional)

These tools will help you make a delicious and healthy soup for cold weather. They’re also great for other soups and stews. By getting these essential kitchen items, you’ll be ready to make tasty and nutritious soups for meal prep.

Equipment Description
Large pot Used for cooking the soup
Blender or immersion blender Used to puree the soup to desired consistency
Measuring cups and spoons Used to measure ingredients
Slow cooker or Instant Pot Used to cook the soup to perfection (optional)

Preparing Your Vegetables

To make a delicious homemade soup, it’s key to prepare your vegetables right. This step is vital in bringing out the natural flavors of the ingredients. It makes your comfort food truly enjoyable. For a gluten-free soup, it’s equally important to choose the right vegetables and prepare them correctly.

When preparing your vegetables, start by chopping them evenly. This ensures they cook consistently. Evenly sized pieces also help in presenting a visually appealing dish. For a Carrot & Red Lentil Soup, chop the carrots, onions, and garlic into small pieces.

Next, heat some oil in a large pot and sauté the vegetables until they are tender and fragrant. This step helps to bring out the natural flavors of the vegetables. It makes your homemade soup more delicious. Some key tips to keep in mind when preparing your vegetables include:

  • Chop the vegetables evenly to ensure consistent cooking.
  • Sauté the vegetables in oil to bring out their natural flavors.
  • Choose the right vegetables for your gluten-free soup to ensure it’s safe to eat.

Mastering the Perfect Carrot & Red Lentil Soup

To make a tasty carrot and lentil soup, start by sautéing the veggies in oil. This makes them tender and fragrant. Use carrots, celery, and onions for a flavorful base.

After the veggies are tender, add lentils and liquid. Bring it to a boil, then lower the heat. Let it simmer for 20-25 minutes, depending on the lentils. Red or green lentils work well for this soup.

Seasoning your vegetable soup is key. Try cumin, curry powder, and fresh cilantro for flavor. A squeeze of lemon juice can also enhance the taste. Experiment to find your favorite mix.

Customizing Your Soup

Exploring nutritious soup recipe means making it your own. You can change a basic healthy soup recipes into something special. Just add different spices, like cumin or paprika, for a new taste.

For vegetarian soup ideas, you can mix and match. Try different veggies, beans, and grains for a filling soup. Add cayenne pepper or fresh lime juice for extra flavor.

carrot and red lentil soup

Want to improve your soup? Change the texture by adding more or less liquid. Or blend it to your liking. You can also make it gluten-free or skip the garlic for a special diet.

Some great ways to customize include:

  • Adding cream or coconut milk for creaminess
  • Using tofu or tempeh for more flavor
  • Trying turmeric or ginger for a unique taste

Serving Suggestions and Pairings

There are many ways to serve Carrot & Red Lentil Soup. You can have it as a main dish with crusty bread or a side salad. It’s great for a weeknight dinner or a weekend lunch. For a bigger meal, try it with whole grain bread or a green salad.

Carrot & Red Lentil Soup is perfect for a chilly day. You can also add diced chicken or shrimp for more protein. Or, serve it cold with yogurt or herbs for a cool summer soup. This makes it a great choice for meal prep, lasting all week.

Here are more ideas:
* Serve with roasted veggies
* Add cream or coconut milk for creaminess
* Use as a base for other soups with chicken or shrimp
* Enjoy cold with yogurt or herbs

Storage and Reheating Guidelines

After making your homemade soup, it’s key to store and reheat it right. This keeps the taste and nutrients in. For Carrot & Red Lentil Soup, cool it down, then put it in an airtight container. Store it in the fridge or freezer.

homemade soup recipes

Refrigeration Tips

Keep your soup in the fridge for up to 5 days. When you reheat, make sure it’s hot enough, at 165°F (74°C). You can reheat it on the stovetop, in the microwave, or slow cooker.

Freezing Instructions

Freezing is another option for up to 3 months. Just label the container with the date and what’s inside. This way, you can enjoy your soup later, just as tasty as when you first made it.

Reheating Methods

Reheating your soup is easy. Use the stovetop, microwave, or slow cooker. Just make sure it’s hot enough to avoid food sickness. By following these tips, you can enjoy your homemade soup, like Carrot & Red Lentil Soup, without losing its flavor or nutrients.

Troubleshooting Common Issues

When making savory soup recipes like Carrot & Red Lentil Soup, you might face some common problems. These include a soup that’s too thick or too thin, or if it lacks flavor. To fix these issues, you can adjust the liquid, add more spices or herbs, or blend the soup to your liking. Adding a splash of lemon juice or vinegar can also brighten the flavors in your comforting soup recipes.

Here are some tips to help you solve common problems with your autumn soup ideas:

  • Check the consistency: If the soup is too thick, add a little more water or broth. If it’s too thin, simmer it for a few minutes to reduce the liquid.
  • Adjust the seasoning: Taste the soup and add more salt, pepper, or herbs as needed to enhance the flavor of your savory soup recipes.
  • Add acidity: A squeeze of fresh lemon juice or a splash of vinegar can help balance the flavors in your comforting soup recipes.

By following these tips, you can fix common issues and create delicious, comforting soup recipes. Whether you’re making a big batch of autumn soup ideas or a simple weeknight dinner, with a little practice and patience, you’ll be a pro at making savory soup recipes in no time.

Remember, the key to making great soup is to taste and adjust as you go. Don’t be afraid to experiment and try new things – and don’t worry if things don’t turn out perfectly at first. With a little practice, you’ll be making delicious, comforting soup recipes like a pro.

Issue Solution
Too thick Add more water or broth
Too thin Simmer to reduce liquid
Lack of flavor Add more spices or herbs

Making Ahead and Meal Prep Tips

Preparing healthy soups like Carrot & Red Lentil Soup can save a lot of time. This recipe is great for batch cooking. It’s also perfect for those who want plant-based meals.

To make ahead, cook the soup, let it cool, and put it in an airtight container. You can keep it in the fridge for up to 5 days or freeze it for 3 months. Reheating it makes it ready to eat hot or cold. This makes it easy for meal prep, letting you freeze portions for quick meals.

  • Portioning out individual servings to make it easy to grab and go
  • Labeling and dating containers so you know what you have and how long it’s been stored
  • Freezing in airtight containers or freezer bags to prevent freezer burn

By following these tips, you can enjoy your Carrot & Red Lentil Soup all week. You can also try other healthy soup ideas and winter recipes for your meal prep.

Conclusion

Carrot & Red Lentil Soup is a true culinary delight. It’s nourishing and flavorful, making it a great choice for any meal. It’s perfect for a cozy day or a quick lunch.

The mix of carrots and red lentils is both tasty and healthy. It’s full of vitamins, minerals, and fiber. Plus, it’s packed with antioxidants, making it a great choice for your health.

So, what are you waiting for? Start making this soup and let the aroma fill your kitchen. Enjoy the warmth and nourishment of Carrot & Red Lentil Soup. Savor every spoonful as you nourish your body and soul.

section>

FAQ

What are the health benefits of Carrot & Red Lentil Soup?

Carrot & Red Lentil Soup is packed with nutrients. It’s full of fiber, protein, and vitamins and minerals. This makes it a healthy choice for your meals.

Can Carrot & Red Lentil Soup be enjoyed in any season?

Yes, you can enjoy Carrot & Red Lentil Soup all year round. It’s great hot or cold, and you can adjust the flavor to your liking.

What are the essential ingredients for making Carrot & Red Lentil Soup?

To make this soup, you’ll need carrots, lentils, onions, garlic, and vegetable broth. Feel free to add your favorite spices and herbs to make it your own.

What kitchen equipment is needed to make Carrot & Red Lentil Soup?

You’ll need a large pot, a blender or immersion blender, and measuring cups and spoons. A slow cooker or Instant Pot can also be helpful.

How do I prepare the vegetables for Carrot & Red Lentil Soup?

Chop the carrots, onions, and garlic into small pieces. Make sure they’re all the same size so they cook evenly. Then, sauté them in oil until they’re tender and smell great.

How do I ensure I make the perfect Carrot & Red Lentil Soup?

Start by sautéing the vegetables in oil until they’re tender. Add the lentils and liquid, then bring to a boil. Lower the heat and simmer until the lentils are soft. Season with your favorite spices and herbs.

How can I customize Carrot & Red Lentil Soup to suit my preferences?

Customize the soup by adding different spices, adjusting the texture, and making dietary changes. Try using gluten-free broth or leaving out the garlic for a low-FODMAP option.

How do I store and reheat Carrot & Red Lentil Soup?

Cool the soup completely, then put it in an airtight container. Refrigerate or freeze it. Reheat to 165°F (74°C) to ensure safety. You can reheat it on the stovetop, in the microwave, or in a slow cooker.

What are some common issues that may arise when making Carrot & Red Lentil Soup?

Issues like a thick or thin soup, or a lack of flavor, can happen. To fix these, adjust the liquid, add more spices or herbs, or blend the soup to your liking.

Can I make Carrot & Red Lentil Soup ahead of time?

Yes, you can make it ahead of time. Cook the soup, let it cool, and then store it in an airtight container. It keeps in the fridge for 5 days or in the freezer for 3 months. Just reheat and enjoy.

Milk Bread: Soft, Fluffy, and Easy to Make


Milk Bread

What makes milk bread so soft and fluffy? How can you get this perfect texture at home? Milk bread comes from Asian cuisine and is loved worldwide. It’s tasty and simple to make. If you love fresh, homemade, or just want to try a new recipe, you’re in the right spot. We’ll dive into milk bread and share tips for making it at home.

Key Takeaways

  • Learn to make soft, fluffy milk bread at home with this easy-to-follow guide
  • Discover the secret to achieving the perfect texture in your homemade milk bread recipe
  • Get tips and tricks for making delicious milk bread, including the best ingredients to use and how to store your bread to keep it fresh
  • Find out how to make milk bread that’s perfect for any occasion, whether you’re looking for a sweet treat or a savory snack
  • Learn how to make milk bread that’s not only delicious, but also nutritious, with a look at the nutritional information and health benefits of milk bread

Understanding Milk Bread’s Rich Heritage

Milk bread has a long history, starting in ancient Asia. You can learn about the origins of traditional milk bread and how it has changed over time. In the 2020s, milk bread variations began to appear in other parts of the world.

In Japan, artisan milk bread is called shokupan or Hokkaido milk bread. It’s the country’s standard bread, known for its soft and slightly sweet taste. The tangzhong technique used in making milk bread keeps it fresh longer.

Some important facts about milk bread are:

  • It’s made with simple ingredients like flour, whole milk, butter, yeast, salt, sugar, and eggs.
  • The bread is often sliced thickly and used for sandwiches, with fruit sandwiches being a favorite.
  • Shokupan has become more popular in Japan than sushi or ramen.

Milk bread is now a key part of many cuisines, thanks to its rich history and cultural importance. You can explore traditional milk bread and milk bread variations to see how it has grown and influenced global food.

Essential Ingredients for Perfect Milk Bread

To make perfect milk bread, you need a few key ingredients. These include milk, bread flour, sugar, and yeast. These milk bread ingredients are vital for the bread’s light, moist, and fluffy texture. The type of milk you choose can also impact the flavor and texture of your milk bread recipe.

A great bakery milk bread recipe combines milk, bread flour, sugar, and yeast. The flour to liquid ratio is usually 1:5. You can try different milks, like whole, skim, or a mix, to see what works best for your milk bread recipe.

Here are some key ingredients to remember when making milk bread:

  • Milk: whole, skim, or a combination of both
  • Bread flour: high-protein flour for better texture
  • Sugar: granulated or brown sugar for added flavor
  • Yeast: active dry or instant yeast for fermentation

Using these essential ingredients and a reliable milk bread recipe will help you make delicious bakery milk bread. Choose high-quality ingredients and follow proper techniques for the best results.

The Science Behind Milk Bread’s Unique Texture

To make the perfect milk bread, you need to know the science behind its texture. You want it to be soft and fluffy on the inside. This comes from the right mix of proteins, fats, and temperatures.

Flour’s protein is key for a chewy texture. But for soft milk bread, you need to balance it. Milk and butter’s fats make the bread tender and fluffy.

Temperature is also important. It affects how starches in flour gelatinize. The best temperature for making tangzhong is 65ºC (149ºF). This pre-gelatinizes starches, making the bread soft and moist.

Key Factors Affecting Milk Bread Texture

  • Protein content in flour
  • Impact of fat molecules from milk and butter
  • Temperature considerations for tangzhong preparation

By mastering these factors, you can make milk bread that’s both soft and fluffy. The right mix of ingredients and temperatures will give you the perfect texture. Your bread will be a joy to eat.

Required Equipment and Tools

To make milk bread, you’ll need a few key items. These include a stand mixer, a dough hook, and a bread loaf pan. A bread machine can also be helpful for those who want an easier process. Precision and control are key, so digital scales and a Pullman bread tin are important.

For milk bread tools, a dough scraper and pastry brush are useful. You’ll also need a large mixing bowl, a measuring cup, and a wooden spoon. Some recipes might ask for special tools, but you can often find substitutes. For example, a saucepan can be used for cooking the tangzhong, and a clean towel can help with proofing.

Here’s a list of basic milk bread equipment and tools you’ll need to start:

  • Stand mixer
  • Dough hook
  • Bread loaf pan
  • Bread machine (optional)
  • Digital scales
  • Pullman bread tin
  • Dough scraper
  • Pastry brush
  • Mixing bowl
  • Measuring cup
  • Wooden spoon

With these tools, you’re ready to make delicious, soft, and fluffy milk bread. Always follow the recipe carefully and feel free to experiment. Happy baking!

milk bread equipment

Step-by-Step Milk Bread Preparation

To make delicious milk bread, follow a simple recipe. The process includes making a tangzhong starter, mixing the dough, proofing, and baking. It requires patience but is worth the effort.

The first step is making a tangzhong starter. Cook flour and milk over low heat, stirring constantly, until it thickens. Let it cool before adding it to the dough.

Next, mix and knead the dough. Combine the starter with flour, yeast, sugar, and salt. Knead until it’s smooth and elastic. Let it rise until it doubles in size.

After rising, shape the dough into a loaf and bake. The loaf should be golden brown and sound hollow when tapped. Your homemade milk bread is now ready to enjoy.

Here’s a quick summary of the process:

  • Prep Time: 20 minutes
  • Cook Time: 35 minutes
  • Proofing Time: 1 hour 10 minutes
  • Total Time: 2 hours 5 minutes

By following this recipe and preparing the dough well, you’ll make a delicious milk bread. It’s sure to impress anyone.

Mastering the Perfect Milk Bread Shape

To get the perfect milk bread shape, you need to know how to handle and shape the dough. A well-shaped loaf can grow up to 1.5 times its original size. This makes the bread light and fluffy. The secret is to handle the dough gently and shape it into a smooth, rounded loaf.

Here are some tips to help you master the perfect milk bread shape:

  • Use a gentle touch when handling the dough to avoid developing the gluten.
  • Shape the dough into a smooth, rounded loaf, making sure to remove any air pockets.
  • Use a bench scraper or a pastry cloth to help shape the dough and prevent it from sticking.

By following these tips and practicing your dough handling and shaping techniques, you can create a beautiful milk bread loaf with a perfect milk bread shape. Remember, mastering the perfect milk bread shape takes time and practice, so don’t be discouraged if it doesn’t turn out perfectly at first. With patience and persistence, you can create a delicious and visually appealing fluffy milk bread that will impress your friends and family.

milk bread shape

Common Variations of Traditional Milk Bread

Exploring milk bread reveals many variations to suit different tastes. From Japanese to Korean milk bread, each has its own twist on the classic recipe.

Japanese milk bread, or Hokkaido milk bread, is famous for its softness and mild sweetness. Korean milk bread, by contrast, has a crispy crust and a sweeter taste.

Western adaptations of milk bread also exist. They often use different ingredients or baking methods. These variations can include:

  • Unique flavor profiles, such as garlic or herb-infused milk bread
  • Different textures, ranging from soft and fluffy to crispy and crunchy
  • Varying levels of sweetness, from mildly sweet to rich and indulgent

Trying out different milk bread variations requires quality ingredients and the right techniques. Whether you like Japanese, Korean, or Western milk bread, there’s always something new to discover.

Storage and Freshness Tips

To keep your milk bread fresh, proper storage is key. You can store it at room temperature, in the fridge, or freeze it. Room temperature between 60°F and 80°F is best. Temperatures below 60°F make it stale faster, while above 80°F can cause mold.

Storing bread in the fridge is not recommended. It leads to moisture on the surface, making it stale quicker. Freezing is a good choice for longer storage. Wrap each piece in airtight plastic and keep it in the freezer’s coldest spot.

When you’re ready to eat it, defrost in the fridge overnight. Or, reheat in the oven at 325 degrees Fahrenheit for 25 to 30 minutes. This keeps the bread fresh and extends its life.

Here are more tips for keeping milk bread fresh:

  • Store bread in a ceramic bread box or a paper bag to keep air moving and prevent drying.
  • Keep bread away from direct sunlight and heat sources.
  • Freeze bread to extend its shelf life and keep it fresh.

By following these tips, you can enjoy your milk bread longer. The secret to keeping it fresh is proper storage and controlling the environment. With the right care, your milk bread will stay fresh for days.

milk bread storage

Troubleshooting Your Milk Bread

When making milk bread, you might face some common issues. We’ll look at some tips to help you fix these problems. One big problem is overmixing, which makes the bread dense and tough. To avoid this, mix the ingredients just until they form a shaggy dough.

Another issue is underproofing, which stops the bread from rising right. To fix this, let the dough rise for the right amount of time. Also, make sure the room is at the best temperature for yeast. Using a thermometer can help check the dough and room temperatures.

Other solutions include checking the yeast’s expiration date and using the right flour. Also, don’t overhandle the dough. By following these tips, you can solve common problems and get a soft, fluffy loaf. Always use fresh ingredients and follow the recipe closely for the best results. With practice and patience, you’ll master making perfect milk bread every time.

Some common issues and their solutions include:

  • Overmixing: Mix ingredients just until they come together
  • Underproofing: Allow dough to rise for the recommended time
  • Overbaking: Reduce baking time or temperature

By using these troubleshooting tips, you can solve common problems. This way, you’ll enjoy making and eating delicious homemade milk bread.

Pairing and Serving Suggestions

There are countless ways to enjoy milk bread. You can have it as a sweet treat or with savory dishes. Try it with jam or honey for a tasty breakfast or snack. It’s also great as a sandwich base, toast, or crouton in salads.

Some favorite ways to enjoy milk bread include:

  • Pairing it with fresh fruits like strawberries or blueberries for a sweet snack
  • Using it for avocado toast with cherry tomatoes and feta cheese
  • Serving it with warm soup, like tomato soup or creamy broth

milk bread pairing

For a savory option, pair milk bread with cured meats and cheeses. It’s also perfect for making croutons or bruschetta. The secret to a great pairing is to try different flavors. Milk bread’s soft texture makes it ideal for your creations.

Health Benefits and Nutritional Information

When we talk about milk bread nutrition, it’s key to know the good and bad. Milk bread has carbs, protein, and fiber, making it a somewhat healthy choice. It gives you long-lasting energy thanks to its complex carbs.

The milk bread benefits also include having selenium and manganese, which are important nutrients. But, watch out for added sugars. Choose high-fiber, high-protein options to get the most health benefits. Eating whole-grain milk bread in a balanced diet can help your overall health.

Here are some key nutritional facts about different types of bread:

  • Whole-wheat bread: 1 slice (25g) contains 77 calories, 13g carbohydrates, 2g fiber, and 4g protein.
  • Whole-grain oatmeal bread: 1 slice (49g) contains 130 calories, 23g carbohydrates, 3g fiber, and 6g protein.

Knowing the nutritional content and health benefits of milk bread helps you make better diet choices. You can enjoy this tasty bread as part of a healthy lifestyle.

Conclusion

Making delicious milk bread at home is easy and fun. This guide shows you how to make soft, fluffy loaves. It’s a joy for both new and experienced bakers.

The secret to great milk bread is using high-quality ingredients and following the steps carefully. With practice, you’ll get better at shaping. Soon, your homemade milk bread will be a favorite in your kitchen.

Don’t stop at the basic recipe. Try different styles like Japanese Hokkaido or Korean milk bread. It’s exciting to create your own version of this classic.

Start baking milk bread and let your creativity flow. Enjoy the process, the smell, and the softness of your bread. Milk bread is more than a treat; it’s a way to share joy with others.

FAQ

What is milk bread?

Milk bread is a soft, fluffy bread made with milk, flour, sugar, and yeast. It has a rich, slightly sweet taste. Its texture is unique, making it different from other breads.

What are the origins of traditional milk bread?

Milk bread’s history goes back to ancient Asia. It was made with simple ingredients like milk, flour, and yeast. Over time, different regions created their own special versions.

What are the essential ingredients for making milk bread?

To make milk bread, you need milk, bread flour, sugar, and yeast. The right mix of these ingredients is key to getting the perfect texture and taste.

What is the science behind milk bread’s unique texture?

Milk bread’s texture comes from proteins, fats, and temperature during baking. These factors work together to make it soft and fluffy.

What equipment and tools are needed to make milk bread?

You’ll need a stand mixer, a dough hook, and a bread loaf pan to make milk bread. You can also use a bread machine or other tools to make it easier.

How do you make milk bread step-by-step?

Making milk bread involves making a tangzhong starter, mixing and kneading the dough, proofing it, and baking. Each step is important for the perfect texture and flavor.

How do you shape milk bread?

Shaping milk bread is an art that takes practice. There are many techniques to shape the dough and create the perfect loaf.

What are the common variations of traditional milk bread?

Over time, milk bread has evolved. Different regions have their own versions, like Japanese Hokkaido style, Korean milk bread, and Western adaptations.

How do you store and keep milk bread fresh?

To keep milk bread fresh, store it properly. Follow guidelines for storage, freezing, and reheating to enjoy it longer.

What are some common issues and troubleshooting tips for making milk bread?

Even with the best recipe, things can go wrong. We’ll cover common issues and tips to fix them, so you can make perfect milk bread.

How can milk bread be paired and served?

Milk bread is versatile and can be paired with many ingredients. We’ll share ideas for sweet and savory pairings, as well as breakfast options.

What are the health benefits and nutritional information of milk bread?

Milk bread is not only tasty but also healthy. We’ll look at its nutritional value, including carbs, protein, and fiber.