
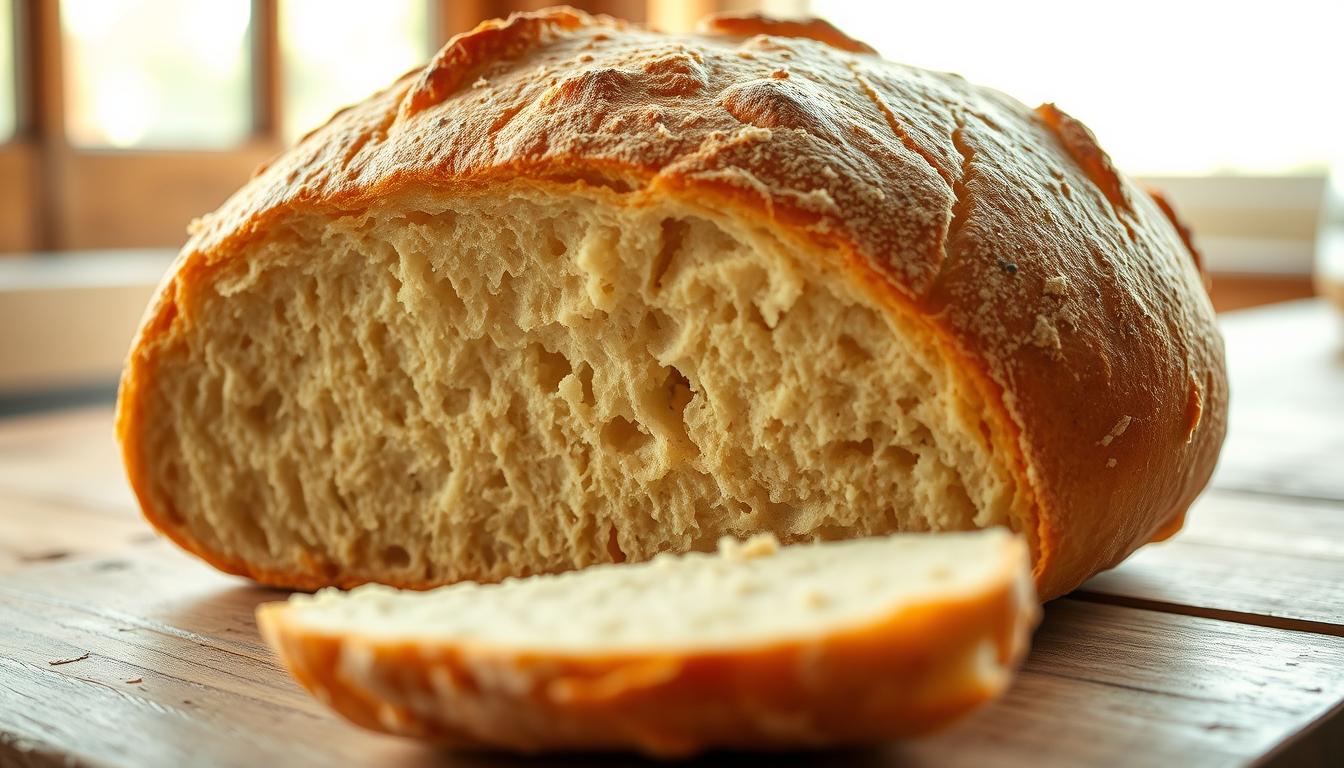
Can you make delicious homemade no-knead bread with just a few minutes of effort? Yes, you can! Easy no-knead bread recipes have made it simple to bake at home. You’ll get a crunchy crust and a soft inside.
With an easy no-knead bread recipe, you can get professional results quickly. No need to spend hours in the kitchen. You can make loaves that are as good as those from local bakeries. Whether you’re new to baking or experienced, no-knead bread is fun to explore.
Key Takeaways
- You can create delicious no-knead bread with minimal effort, using a simple no-knead bread recipe.
- No-knead bread recipes typically require just a few minutes of active preparation time.
- Homemade no-knead bread can be made with basic ingredients, including bread flour, yeast, salt, and water.
- The ideal dough rising temperature for no-knead bread is between 25 – 30°C (77 – 86°F).
- No-knead bread can be baked in a Dutch oven, yielding a crispy crust and fluffy interior.
- Cooked no-knead bread stays fresh for 2 days and can be frozen for up to 3 months.
The Revolutionary No-Knead Bread Method
The no-knead bread method has become very popular in recent years. Its history is quite fascinating. This method makes baking at home simple and effortless, allowing you to create artisanal loaves easily. It’s great for those who want to bake without spending hours in the kitchen.
Jim Lahey is credited with popularizing this method in the early 2000s. His approach involves mixing the dough and letting it rest for a long time. This results in a crispy crust and a chewy interior. The benefits of no-knead baking include ease of preparation, flexibility with ingredients, and delicious results. You can also try different no-knead bread variations to create unique flavors and textures.
Some of the key benefits of the no-knead bread method include:
- Easy to prepare: The no-knead bread method requires minimal effort and time.
- Flexible ingredients: You can experiment with different types of flour, yeast, and other ingredients to create unique flavor profiles.
- Delicious results: The no-knead bread method produces a crispy crust and a chewy interior, making it perfect for sandwiches, toast, and other bread-based dishes.
https://www.youtube.com/watch?v=3xtj9X1jDc0
Essential Equipment for Perfect No-Knead Bread
To make perfect no-knead bread, you need the right tools. You’ll need a Dutch oven, bread stone, and baking sheet. These tools help make a crispy crust and a well-cooked inside.
A Dutch oven is a must-have for baking no-knead bread at home. It creates a steamy environment for a crispy crust. Preheat the Dutch oven to 500°F for 45 minutes before baking.
After putting the dough in, lower the temperature to 450°F for 25 minutes. Then, bake for an extra 15 to 20 minutes without the lid.
You also need a bread stone to improve the crust. A baking sheet is key for shaping and letting the dough rise. When picking your tools, think about the material and size. A bigger Dutch oven or bread stone is better for making more bread.
- Dutch oven: Preheating and baking the bread
- Bread stone: Enhancing the crust
- Baking sheet: Shaping and rising the dough
Investing in the right tools, like a Dutch oven, bread stone, and baking sheet, will help you make delicious bread at home.
Understanding Your Ingredients
When making no-knead bread, the quality of your ingredients matters a lot. You need to pick the right flour, yeast, and water temperature for the best results. You’ll also need flour, yeast, water, salt, and sometimes sugar or nuts.
The flour you choose can change your bread’s texture and taste. You can use all-purpose flour, bread flour, or whole wheat flour. The yeast you pick is key for making the dough rise. You can use active dry yeast or instant yeast, depending on what you like. The water’s temperature is also important for activating the yeast and making a smooth dough.
Flour Types and Effects
Different flours can make your no-knead bread turn out differently. All-purpose flour makes a lighter, airier bread. Bread flour makes a denser, chewier bread. Whole wheat flour adds a nutty flavor and a coarser texture.
Yeast Selection Guide
Choosing the right yeast is important for your no-knead bread. Active dry yeast needs to be rehydrated before use. Instant yeast can be added directly to the dry ingredients.
Water Temperature Matters
The water’s temperature is key for activating the yeast and making a smooth dough. The best temperature is between 105-110°F (40-43°C). Water that’s too hot or too cold can affect your bread’s rise and texture.
Salt and Additional Ingredients
Salt is essential in no-knead bread, helping control the yeast and adding flavor. You can also add sugar, nuts, or seeds for different tastes. The key is to experiment and find what you like best.

Understanding your ingredients can help you make a delicious and unique loaf. Choose the right flour, yeast, and water temperature for the best results.
| Ingredient | Function |
|---|---|
| Flour | Provides structure and texture |
| Yeast | Helps the dough rise |
| Water | Hydrates the dough and activates the yeast |
| Salt | Controls the yeast and adds flavor |
The Basic No-Knead Bread Recipe
To make a tasty basic no-knead bread recipe, you need just 4 things: flour, yeast, salt, and water. This easy no-knead bread recipe is great for beginners. It’s simple and needs only a few ingredients. You’ll need 3 cups of flour, 1.5 teaspoons of salt, 0.5 teaspoons of yeast, and 1.5 cups of water at room temperature.
Preparing this simple no-knead bread recipe takes about 5 minutes. Then, let it rest for 12-18 hours at room temperature. Baking takes around 40 minutes. Bake in a 6-quart Dutch Oven at 450 degrees Fahrenheit.
Here’s a quick summary of the recipe:
- 3 cups all-purpose flour
- 1.5 teaspoons salt
- 0.5 teaspoons instant yeast
- 1.5 cups room temperature water

This basic no-knead bread recipe is perfect for beginners. It’s easy to make and tastes amazing. Try this easy no-knead bread recipe today and enjoy homemade bread!
Mastering the Long Fermentation Process
To make the perfect loaf, you must grasp the long fermentation process. This step lets the dough rest and rise for 12 to 18 hours. Yeast breaks down sugars, making the dough rise. Keeping the temperature right is key for the dough’s texture.
Getting the timing right is also important. The best temperature for fermentation is about 72 degrees F. Let the dough rest in a cool, draft-free spot. Watch for bubbles and a puffed look to know it’s ready.
Here are some key factors to consider when mastering the long fermentation process:
- Temperature control: Keep the dough at a consistent temperature between 68-72 degrees F.
- Timing fermentation: Allow the dough to ferment for at least 12 hours, but no more than 18 hours.
- Visual cues: Look for bubbles on the surface and a slightly puffed texture to determine if the dough is ready.

Mastering the long fermentation process lets you make delicious, authentic artisanal bread. Keep an eye on temperature, timing, and visual cues for perfect dough.
| Factor | Ideal Condition |
|---|---|
| Temperature | 68-72 degrees F |
| Timing | 12-18 hours |
| Visual Cues | Bubbles on surface, slightly puffed texture |
Shaping Techniques for Beautiful Loaves
Shaping techniques are key to making no-knead bread look great. The right way to shape can give you a smooth crust and a nice look. The boule, a French term for round bread, is a popular choice.
To shape a boule, use a banneton or a bowl. These tools help you get the right shape. Dough weights vary by basket size. An 8-inch basket holds 500 to 650 grams, a 10-inch holds 700 to 1000 grams, and a 12-inch holds 1100 to 1300 grams.
Here are some tips for shaping no-knead bread:
- Use a banneton or a bowl to help create the desired shape
- Make sure the dough is smooth and elastic at the end of bulk fermentation
- Achieve a tight outer skin by shaping the dough tightly
- Use a bench scraper to help form a tight skin on the dough when shaping small buns or rolls

Shaping no-knead bread takes practice, but with the right techniques, you can make stunning loaves. The right shaping can greatly improve your bread’s look. Whether you’re making a boule, batard, or baguette, the right technique will impress everyone.
Creating the Perfect Crust
To get a perfect crust, you need to think about a few things. These include steam baking, scoring patterns, and keeping the right temperature. A great crust can really elevate the taste of your bread. So, it’s worth putting in the effort to get it just right.
Steam Baking Methods
Steam baking is key for a crispy, golden crust. It makes the crust both crunchy and full of flavor. You can use a steam injector or a Dutch oven with a lid to achieve this.
Scoring Patterns
Scoring patterns also play a big role in your bread’s crust. Different patterns can change the texture and look of your bread. Try out different designs to see what you like best. You might start with a simple cross or try something more complex.
Temperature Control
Keeping the right temperature is vital for a perfect crust. The best baking temperature is between 425°F and 475°F. Make sure your oven is at the right temperature before you start. A thermometer can help you check the oven’s temperature and adjust it if needed.
Here’s a quick rundown of what you need for a perfect crust:
- Steam baking methods: use a steam injector or a Dutch oven with a lid
- Scoring patterns: experiment with different patterns to find the one that works best for you
- Temperature control: ensure that your oven is at the correct temperature before baking
Troubleshooting Common Issues
When making no-knead bread, you might run into some common problems. Troubleshooting common issues is key to getting that perfect crust and crumb. One big issue is overproofing, which can make the bread fall flat or feel dense.
To steer clear of no-knead bread problems, keep an eye on how the dough ferments. Common mistakes like old yeast, wrong water temperature, or mixing too much can ruin your loaf.
Here are some tips for troubleshooting common issues:
- Make sure your yeast is fresh to help it ferment well.
- Use water between 105°F and 115°F to wake up the yeast.
- Don’t overmix the dough to prevent a dense, tough crumb.
By following these tips and watching out for common mistakes, you can dodge no-knead bread problems. Aim for a delicious, crusty loaf. Always check on the dough’s fermentation and tweak the recipe if needed for the best outcome.
Creative Variations for Your No-Knead Bread
Once you get the hang of making no-knead bread, you can try new things. You can mix in whole wheat flour for up to 25% of the all-purpose flour. This makes your bread healthier and gives it a richer taste.
Adding seeds or nuts like pumpkin, sesame, or walnuts can make your bread crunchy and flavorful. You can also spice things up by adding dried herbs, spices, or cheese. For instance, adding dried rosemary and olive oil can give your bread a Mediterranean flair.
Here are some tips for trying new things:
- Start with small changes and see how they affect the final product
- Keep track of your ingredients and proportions so you can repeat your successes
- Don’t be afraid to try new and unusual ingredients to create unique flavor combinations
Exploring different variations can make your no-knead bread-making even more exciting. You can play with whole wheat, seeds, nuts, or spices. The possibilities are endless, and the fun is just starting.
Conclusion: Your Journey to Artisanal Bread Making
As you finish your no-knead bread-making journey, think about how proud you must feel. You’ve learned to make delicious bread, just like the pros. This is thanks to the tips and techniques from this article.
Sharing your homemade bread with others is truly special. The smell of fresh bread in your kitchen makes everyone happy. Your skills have grown, and you’re now excited to try new flavors and textures.
The journey of making no-knead bread is just as important as the bread itself. It’s about the joy of making something good with your own hands. Keep improving your skills and trying new recipes. There’s always more to learn and enjoy.
So, keep baking and learning. Your journey as an artisanal bread maker is just starting. There are many tasty adventures ahead of you.